Physical Address

304 North Cardinal St.
Dorchester Center, MA 02124

Halloween Witch Hat Cookies

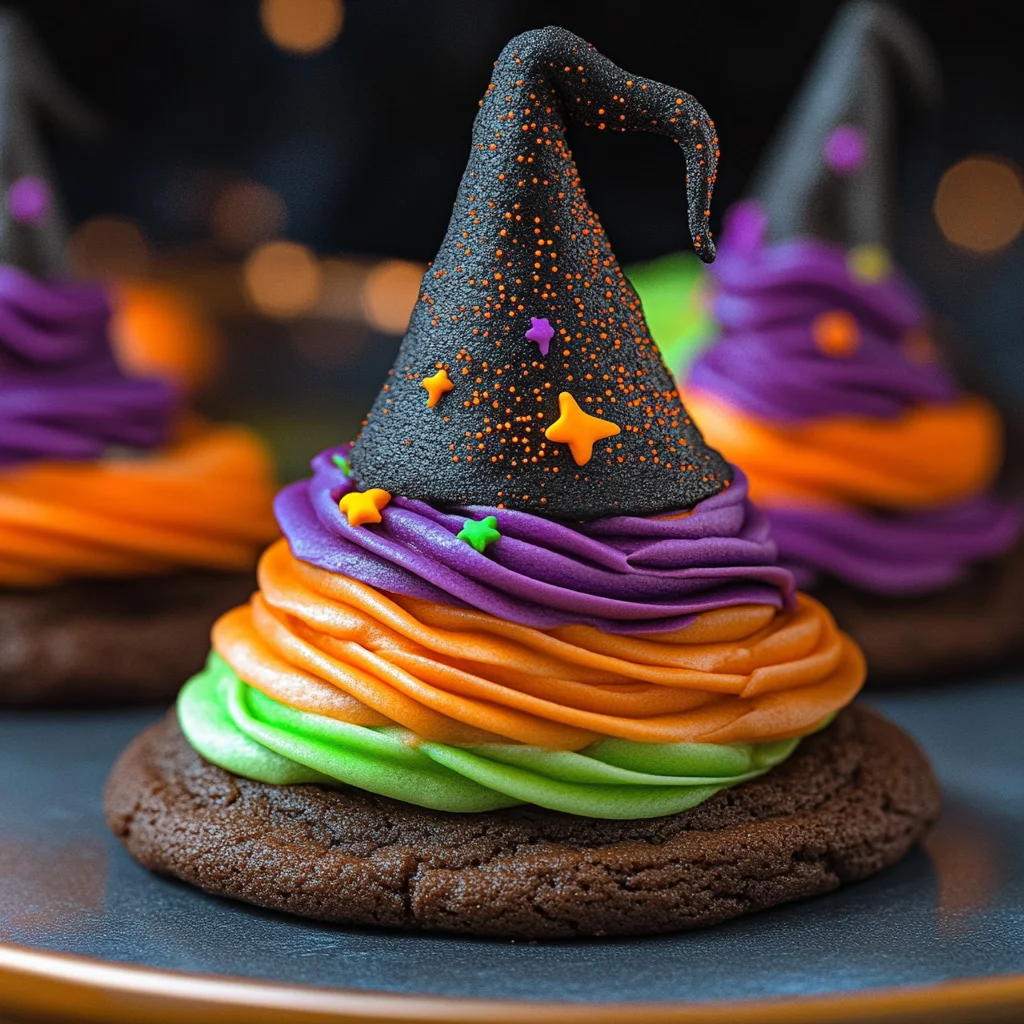
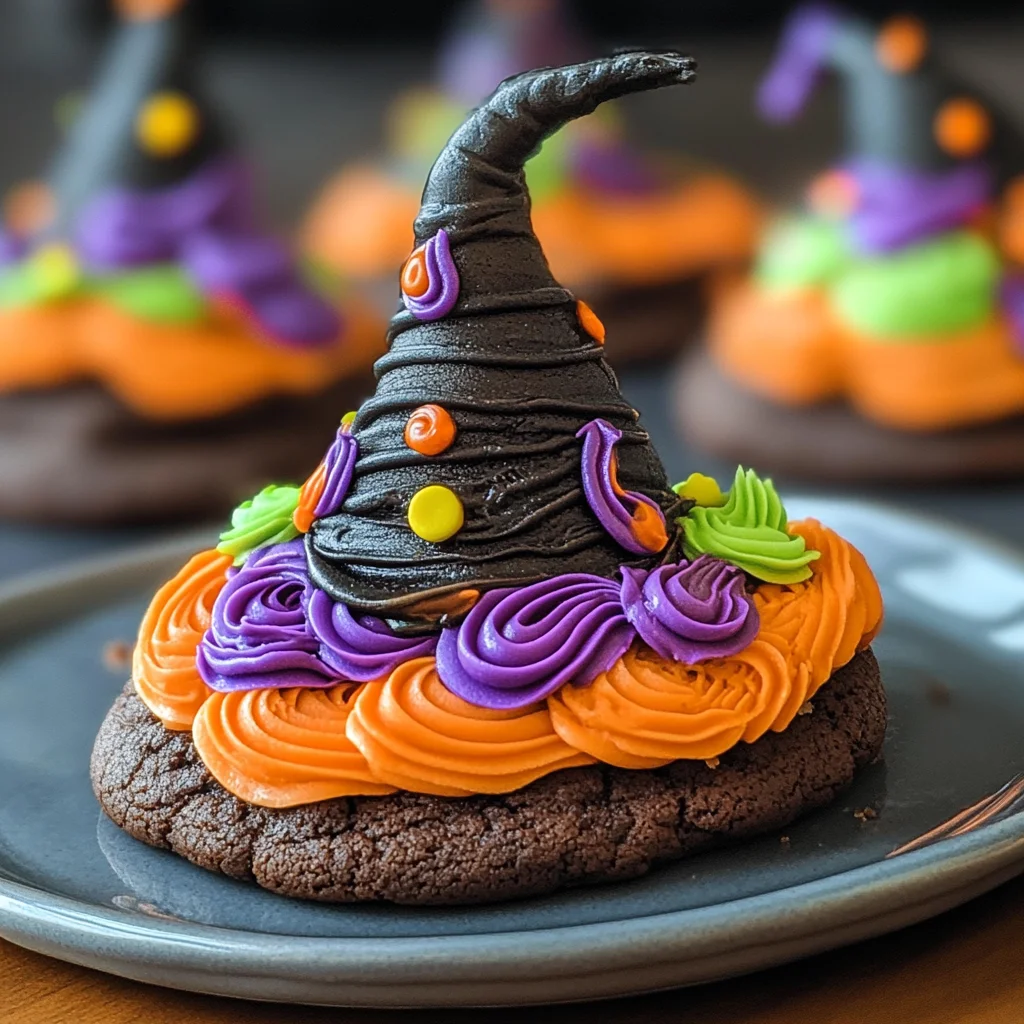
These Halloween Witch Hat Cookies are a delightful treat that will enchant your Halloween party guests. Perfect for family gatherings or spooky celebrations, these cookies combine delicious flavors with a fun, creative twist. With their chocolaty goodness and easy customization options, they’re sure to be a hit with both kids and adults alike!

Why You’ll Love This Recipe

  • Fun to Make: This recipe is a great activity to do with your kids, making memories while baking together.
  • Creative Presentation: The unique witch hat shape makes these cookies visually stunning and perfect for Halloween-themed parties.
  • Deliciously Decadent: Rich chocolate cookies paired with colorful icing provide a delightful flavor combination that everyone will love.
  • Versatile Decorations: Customize the colors and designs to match your party theme or personal taste.
  • Easy to Assemble: With simple steps and readily available ingredients, you’ll have these cookies ready in no time.
Halloween

Tools and Preparation

To create these fun Halloween Witch Hat Cookies, you’ll need some essential tools. Gather everything before you begin for a smooth baking experience.

Essential Tools and Equipment

  • Cupcake Cones Baking Rack
  • Parchment Paper
  • Decorating Bags with Tips
  • Mixing Bowls
  • Knife

Importance of Each Tool

  • Cupcake Cones Baking Rack: This tool holds the sugar cones upright while the cake batter bakes inside, ensuring even cooking.
  • Decorating Bags with Tips: These bags allow for precise piping of icing decorations, helping you create beautiful witch hats effortlessly.

Ingredients

Ingredients:
Favorite Cake Mix or Try Wilton’s Chocolate Cake Recipe
Store Bought Chocolate Cookies or Try This Recipe from Wilton
Lemon Yellow Icing Color
Black Color Mist Food Coloring Spray
Rose Icing Colors Pink Food Coloring
Violet Icing Color, Gel Food Coloring
Golden Yellow Icing Color
Orange Icing Color
Sugar Cones
Creamy White Decorator Icing, 4 lb. Tub

How to Make Halloween Witch Hat Cookies

Step 1: Prepare & Bake the Cones

  1. Prepare the cake mix according to your chosen recipe’s instructions.
  2. Place the Cupcake Cones Baking Rack on a cookie sheet.
  3. Insert the sugar cones into the rack and fill each cone with 2 tablespoons of cake batter.
  4. Bake and cool the cones following the timing instructions for your recipe.

Step 2: Spray the Cones

  1. If needed, trim the risen cake at the top of each cone using a knife.
  2. Place the cones wide side down on parchment paper.
  3. Using Black Color Mist, spray each cone black.
  4. Allow them to dry for about 10 to 15 minutes.

Step 3: Tint the Icing & Prepare the Bags

  1. Tint 1 cup of creamy white decorator icing orange.
  2. Tint another cup of icing purple by combining violet and rose icing colors.
  3. Prepare two decorating bags with tip 2B and fill them separately with orange and purple tinted icing.
  4. Simultaneously, tint ¼ cup of creamy white decorator icing yellow by mixing golden yellow and lemon yellow icing colors. Place it in a bag with tip 3 attached.

Step 4: Assemble the Witch Hats

  1. Pipe a small amount of orange icing in the center of a cookie; place a cone on top.
  2. With tip facing outwards, pipe a band around half of the cones’ wide ends and smooth it out using a spatula.
  3. Repeat this process using purple icing on the other half of cookies and cones; let them set for about 15 to 20 minutes.
  4. Finally, use yellow tinted icing (with tip 3) to pipe buckles around the bands on each hat and let them set for an additional 15 to 20 minutes before enjoying!

How to Serve Halloween Witch Hat Cookies

These Halloween Witch Hat Cookies are not just a delicious treat; they also make a fun centerpiece for your Halloween festivities. Here are some creative serving suggestions to delight your guests.

On a Festive Platter

  • Arrange the cookies on a colorful platter surrounded by Halloween-themed decorations like plastic spiders or mini pumpkins.

With Spooky Drinks

  • Pair these cookies with themed beverages like pumpkin spice lattes or spooky punch for an extra festive touch.

As Party Favors

  • Wrap individual cookies in clear bags tied with orange ribbon. They make perfect party favors for guests to take home.

At a Cookie Decorating Station

  • Set up a cookie decorating station where guests can add their own toppings or icing to personalize their witch hat cookies.

How to Perfect Halloween Witch Hat Cookies

To ensure your Halloween Witch Hat Cookies are a hit, follow these simple tips.

  • Use fresh ingredients: Fresh cake mix and icing will enhance the flavor and texture of your cookies.

  • Be precise with baking: Follow the baking times closely to prevent overbaking, which can lead to dry cookies.

  • Customize colors: Feel free to experiment with different icing colors beyond orange and purple for unique designs.

  • Keep cones upright: Ensure that the sugar cones stay upright while drying by using a tall container or cupcake holder.

  • Practice piping: If you’re new to piping, practice on parchment paper first for smoother results on your cookies.

Best Side Dishes for Halloween Witch Hat Cookies

Pairing side dishes with your Halloween Witch Hat Cookies can enhance the experience. Here are some great options to consider.

  1. Pumpkin Soup: A warm, creamy soup that captures the essence of fall flavors.

  2. Cheesy Bat Wings: Chicken wings tossed in cheese sauce, perfect for those who love savory snacks.

  3. Ghostly Veggie Platter: A selection of fresh vegetables shaped like ghosts, served with dip for a healthy side.

  4. Spooky Pasta Salad: A colorful pasta salad mixed with seasonal veggies and spooky-shaped pasta pieces.

  5. Monster Mash Potato Casserole: Creamy mashed potatoes baked until golden, adding comfort to your dessert table.

  6. Witch’s Brew Punch: A refreshing drink made from fruit juices and soda, garnished with floating eyeball candies (grapes).

  7. Chocolate-Covered Pretzels: Sweet and salty treats that complement the sweetness of the witch hat cookies perfectly.

Enjoy making and serving these delightful treats at your next Halloween gathering!

Common Mistakes to Avoid

When making Halloween Witch Hat Cookies, it’s easy to run into some common pitfalls. Here are a few mistakes to avoid for the best results.

  • Incorrect baking time: Always follow the recommended baking times for your cake mix or cookie recipe. Underbaking can lead to doughy cones, while overbaking may dry them out.

  • Skipping cooling time: Let the sugar cones cool completely before decorating. If they’re warm, the icing might melt and lose its shape.

  • Not using piping bags properly: Ensure you fill the piping bags with enough icing and use the right tip size. A too-small opening can cause frustration when trying to decorate.

  • Improper cone trimming: Trim the cake tops evenly; otherwise, your witch hats may look uneven. Use a sharp knife for clean cuts.

  • Ignoring food coloring guidelines: Follow the instructions on food coloring for achieving vibrant colors without over-saturating your icing. Too much can affect flavor and texture.

Halloween

Storage & Reheating Instructions

Refrigerator Storage

  • Store cookies in an airtight container.
  • They will stay fresh in the fridge for up to 5 days.

Freezing Halloween Witch Hat Cookies

  • Wrap each cookie tightly in plastic wrap.
  • Place them in a freezer-safe container and freeze for up to 2 months.

Reheating Halloween Witch Hat Cookies

  • Oven: Preheat to 350°F (175°C) and warm cookies for about 5-10 minutes.
  • Microwave: Heat a cookie on high for about 10-15 seconds, checking for warmth.
  • Stovetop: Place a cookie in a pan over low heat, covering it until warmed through.

Frequently Asked Questions

Here are some frequently asked questions about making Halloween Witch Hat Cookies.

How can I customize my Halloween Witch Hat Cookies?

You can customize them by using different colors of icing or adding sprinkles on top of the hats for extra flair!

Can I make these cookies ahead of time?

Yes, you can prepare the witch hats a day or two in advance. Just store them properly to maintain freshness.

What is the best way to store Halloween Witch Hat Cookies?

Store them in an airtight container at room temperature or refrigerate them for extended freshness.

Are there any alternatives to store-bought chocolate cookies?

You can bake your own chocolate cookies using a simple chocolate cookie recipe if you prefer homemade treats!

Final Thoughts

These Halloween Witch Hat Cookies are not only fun and festive but also versatile! You can easily customize decorations based on your favorite colors or designs. Get creative and enjoy making these delightful treats with family and friends this Halloween!

Print
clock clock iconcutlery cutlery iconflag flag iconfolder folder iconinstagram instagram iconpinterest pinterest iconfacebook facebook iconprint print iconsquares squares iconheart heart iconheart solid heart solid icon
Halloween Witch Hat Cookies

Halloween Witch Hat Cookies


  • Author: Laura Milligan
  • Total Time: 50 minutes
  • Yield: Approximately 12 cookies

Description

Indulge in the spooky spirit of Halloween with these enchanting Halloween Witch Hat Cookies. Perfect for festive gatherings, these delightful treats combine rich chocolate cookies with whimsical sugar cones, creating a visually stunning centerpiece. Easy to make and fun to decorate, these cookies allow for creative flair with colorful icings and personalized designs. Whether you’re celebrating with children or hosting an adult-themed party, these cookies are sure to be a crowd-pleaser. Get ready to impress your guests and create lasting memories with this playful treat!


Ingredients

  • Cake mix (chocolate or your favorite flavor)
  • Sugar cones
  • Store-bought chocolate cookies or homemade chocolate cookie dough
  • Creamy white decorator icing
  • Food coloring (black, orange, purple, yellow)

Instructions

  1. Preheat your oven as per cake mix instructions.
  2. Prepare the cake batter and fill each sugar cone using a cupcake cones baking rack.
  3. Bake until golden and let cool completely.
  4. Spray the cooled cones black using color mist and allow drying time.
  5. Tint your decorator icing in desired colors for decoration.
  6. Assemble by piping icing on cookies, topping them with decorated sugar cones, and adding finishing touches.
  • Prep Time: 30 minutes
  • Cook Time: 20 minutes
  • Category: Dessert
  • Method: Baking
  • Cuisine: American

Nutrition

  • Serving Size: 1 cookie (50g)
  • Calories: 210
  • Sugar: 18g
  • Sodium: 130mg
  • Fat: 8g
  • Saturated Fat: 3g
  • Unsaturated Fat: 4g
  • Trans Fat: 0g
  • Carbohydrates: 32g
  • Fiber: 1g
  • Protein: 2g
  • Cholesterol: 10mg

Keywords: Customize icing colors based on your Halloween theme for a unique touch. Ensure sugar cones are upright during drying to maintain their shape. Consider adding sprinkles or edible glitter for extra flair.

Leave a Reply

Your email address will not be published. Required fields are marked *

Recipe rating